Decommision VM from Cluster Using HYCU 4.1
The following post is a contributed article by Hector Maldonado, IT Manager, Steel and Pipes. Steel and Pipes is the largest locally owned industrial products supplier in Puerto Rico. Our thanks to Hector for sharing this and sharing what's new within HYCU 4.1 that customers can use to their advantage.
Backup Last Copy and Archive with Long-Term Retention
Scenario: In the event of upgrading or adding application VMs in the cluster, there are scenarios that the original or latest working VM is no longer needed but only for references.
The problem when VMs are turned off for long periods, they not only consume storage space, they also trigger alerts and warnings such as:
- Outdated hypervisor guest tools versions
- Unprotected VM in protection domains
- Waste of storage space when present in protection domains
- Old snapshots present will prevail
- Backup software will continue backing up consuming resources, time.
- If turned on, can create IP conflicts or application conflicts if not documented.
The solution is HYCU backup with long-term archiving.
Procedure Step 1: Target Section Add or configure a new target as Archive for long term archiving purposes.
Step 2: Archiving Settings
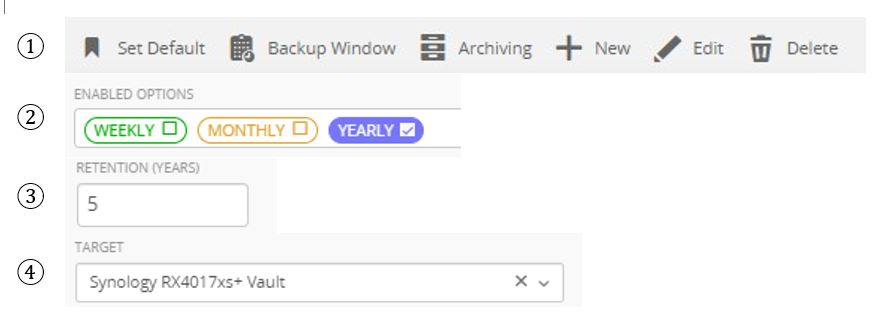
Press the Archiving button ① at top right and create an Archiving rule then ② select “Yearly” in enabled options, then ③ type the amount of years desired to hold the copy of the vm and ④ select the target in the step 1.
Step 3: Policies Section
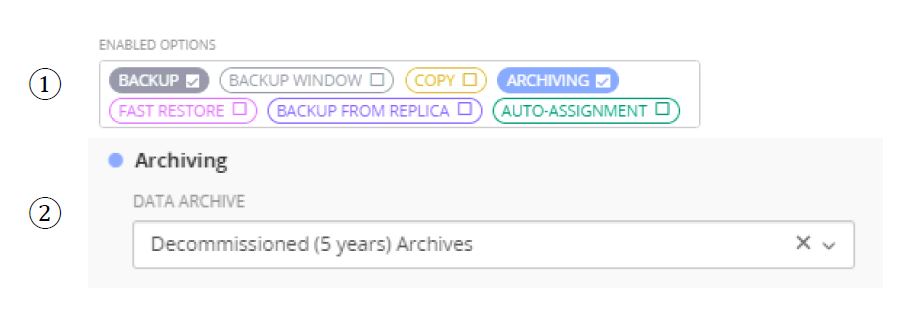
Fill in the desired name, description and retention of the backup, however you will discard the backup after the archiving process. Create a policy and ① select “Archiving” in the Enabled Options then ② select the data archive created in step 2.
Save the policy.
Step 4: Assign the Policy
Select the desired virtual machines for archiving, let the backup finish.
Step 5: Manual Archive
Select the restore point created by the backup then press the “Run Archiving” button. This will create the Archiving copy with the retention specifications.

Step 6: Unassign Policy and expire backups
Select the virtual machine and unassign the policy and select the restore point created by the backup and expire it.
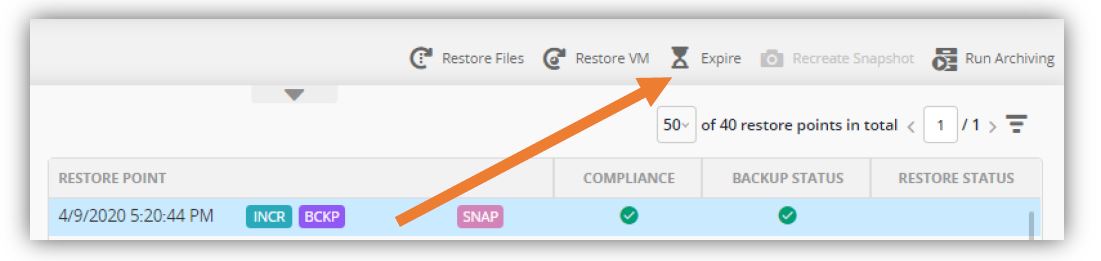
A confirmation will show, select the “Backup and Copy” but leave “Archive” unchecked. This will remove the backup, copies and snapshots from the cluster and will leave the Archived version in the configured target.

For extra protection, make sure you have those archives in a storage with drive redundancy.
This procedure can be used to protect and restore data in the event of a ransomware attack that affect the VM in the OS level by having isolated archives.

Subbiah Sundaram is the SVP, Product at HYCU. Subbiah spearheads product management, product marketing, alliances, sales engineering, and customer success with more than 20 years' experience delivering best-in-class multi-cloud data protection and on-premises solutions. A Kellogg Management School MBA graduate, Subbiah has worked with leading companies such as EMC, NetApp, Veritas, BMC, CA, and DataGravity.